Monday, May 24, 2021

The old is new again

Last month, I felt that old, familiar urge to cast on for a simple sock. The kind of sock you can take anywhere. The kind of sock I would normally knit at a conference. Suddenly, it clicked: my big national (but virtual) conference started the next day, and I felt the absence of that sock!

I was so discombobulated that I wrote the wrong year in my notebook... clearly wishing it was 2019 and we were gathering in person.

Those socks got worked on bit by bit, and now they're done:

They fit Sharon's feet and are my standard, top-down sock with 3x3 ribbing on the leg and top of foot. The heel flap is worked in eye-of-partridge stitch:

I think this ball of sock yarn may be the oldest sock yarn in my stash, and now it is a new pair of socks. I entered it in Ravelry in August, 2007, when I first got my account, so it predates that. It's nice to have finally used it. These will seem perfectly seasonal when the autumn rolls around.

I've also been making some progress on my Sanquhar gloves (old design, new gloves). I've reached the point where it's time to divide for the fingers:

The pattern directs me to start all the fingers at the same time, but I've read that many knitters stagger them. This makes sense to me, because when I look at my hand, my fingers don't all begin at the same "latitude" (so to speak). I need to think about how this is achieved, especially because these gloves feature tiny gussets at the base of each finger. This seems difficult, so I've put these aside until a day when I feel really clever. 

Of course, that means I need another easy knitting project. I've started another of the Elemental hats. You'll recall that I've made all 5 designs in the collection (making this an "old" pattern for me), but my friend Heidi admired them all, and I'm making her one - the Katara design. Her favorite colors are gray and "mushroom" (as she calls it), and I have some beautiful handspun mushroom-y BFL in my stash that I'd love to use for something. The cream-colored yarn is handspun Rambouillet. (The green is waste yarn in the provisional CO.)

That should keep me occupied through social knitting. And I need some suitable knitting for social occasions - I'm thrilled to report that later this week, my local knitting group is meeting in person and indoors for the first time in over a year. We gathered outdoors on occasion last year, when the weather wasn't too hot or too cold, too rainy or too windy. We are now all fully vaccinated and this meeting is sure to be a memorable one, with lots of hugs and probably champagne. The old will seem new yet again! I CAN'T WAIT.


Sunday, May 16, 2021

Fun with rolags

I've been playing with my blending board, practicing the techniques I learned from Heavenly Bresser in a class a few weeks ago. Want to see?

To recap where we left off before... Here is a color combination known as a "square," where the four main colors are fairly equidistant from each other on the color wheel. I also have a bit of silk (the undyed fiber on the bottom left), and a very colorful bit of recycled sari silk (bottom right):

I filled the blending board and pulled these rolags off (one was a little thin in the middle and became two shorter rolags):

I spun these on my new Electric Eel Wheel (the espinner):
I wound the singles into a center pull ball and plied directly from it, using both ends to make a 2-ply yarn:
I ended up with a little 30 gram skein of yarn. It's so soft and cute! My mom says this yarn looks like a fiesta:

For my next batch, I returned to the idea of a split-complementary. The blues and greens are analogous colors, and the orange is the complementary on the opposite side of the color wheel. The sari silk is just for texture, additional pops of color, and fun:
This is what the rolags looked like after blending:
I made a center-pull ball out of the singles, just like with the last batch:

And here is the resulting skein, just a little one at 16.3 grams. I spun this one on my Ladybug:

Finally, I decided to make a larger skein. I know I can easily fit about 30 grams of fiber on the blending board at one time, so I collected colors and amounts to total double that.  These are the colors (but not the amounts) - I was going for another split complementary with blue-purple as the analogous colors, and gold-yellow as the complementary. I also have some gray to tone things down, and some camel down for texture and color muting:

I weighed each color and split it in half, separating the halves into baskets (the sari silk add-ins aren't worth weighing):
This time, I kept notes on what I added in each layer, so I could roughly duplicate it in the next batch. In the end, I had two trios: 

I spun the singles on the EEW, spinning some plain white fiber between sets so I would know where the dividing point was. I transferred those singles to storage bobbins, and plied from them:
And here is what I got! This skein is 51.5 grams... less than I planned, but that's because I realized that I couldn't incorporate larger amounts of the camel down in the blend as I originally thought. It's still a soft and pretty skein!
The blending possibilities are truly endless. I've signed up for another (online) blending board class later this month, with Sheepspot teacher Sasha Torres. I can tell from her Instagram reels that she uses a very different technique for blending and rolling. It's always helpful to learn from many teachers, and I know I'll learn something new. One thing I need to work on it keeping the rolags light and airy, so they don't strain my hands to spin long draw.

Thursday, May 13, 2021

Stranded - Echo hat, Sanquhar Gloves

To continue the streak of Woolly Wormhead hats I've knit in 2021, here is Echo:

It's from the Imperceptions collection, which is full of delightfully labyrinthine designs. They all use fingering weight yarn, so I can easily dive into my sock yarn cabinet to find suitable skeins. The only trick is to select colors with high contrast. Here I'm using some green that's left over from Dave's 50th birthday sheepy socks (and now that green is gone, for all practical purposes...except for a small ball I can use to make blanket squares if I ever do that again), along with a rich brown from an unbroken skein. I originally purchased the brown with two other coordinating colors to make the popular Color Affection shawl, but then I won a kit from Miss Babs with 3 skeins for the same pattern, so I used those. Over the years I've reassigned the other skeins to other projects, and this brown was the last one. Those colors really did look nice together back in 2012 when I bought them!

Like the Circe hat (from the same collection), Echo includes a lateral braid between the corrugated ribbing and the main body:

I really enjoy this fancy little detail. The final hat is a bit slouchy, which some people like and others don't. Here is my hat model:
This had doesn't have an owner yet, but it went into my handknit hat stash and will patiently await its destiny. 

There are still two designs from this collection that I haven't made yet. But rather than start another hat, I decided to shake things up and knit colorwork gloves. This is a kit I got at A' the Airts in Scotland on my big 2019 trip (boy am I glad that happened before COVID):

Take a minute and google "sanquhar gloves" - you'll see some amazing designs. This is a special, fancy glove made in the 19th century. It was traditional to knit the name or initials of the wearer into the cuff. This yarn is labelled "3ply," which is a "weight" of yarn in the UK system. For comparison, what we call "fingering" is called "4ply" in the UK. 3ply is, well, 1 ply less, so it's 25% skinnier than fingering. Is it laceweight? Maybe. Maybe heavy laceweight. Anyway, that is what they use, and the gloves are usually worked on 1.75mm needles. The kit came with a set of Addi 1.75 mm dpns. They are 20 cm in length, which is a bit long by U.S. standards. I tried to start the gloves using those needles and it was super difficult, so I started over on two sets of circulars (my preferred mode of knitting socks). Luckily, I had 1.75mm circs on hand.
I decided not to use my middle initial here for a practical reason. If the gloves came out too small for my hands, I could give them to my mom! Our first and last initials are the same, but not the middle. In hindsight, I should have narrowed the white field on which the initials lie, thus eliminating the need to catch long black floats that show through to the front side a little bit. Live and learn.

Here is the front of the left glove as of today. The main pattern is the most popular one and is called "the Duke" - you'll see it a lot if you look at Sanquhar gloves. I've pinned it out so it doesn't roll. Here is the back, where you can see the thumb stitches being held on waste yarn:

My thumb gusset increases are not perfect, but I decided not to try to tink back. They are very fiddly, especially at the beginning. I bet the next glove will be better.

I'm coming up on the point at which the fingers each need to be worked separately. The pattern shows every finger starting on the same row, but I've read that many knitters stagger them. A quick glance at your own hand will show why - our fingers do not all start on a straight line! I will think about that a little as I approach that point. 

My (extensive) sock knitting experience and my increasing competency with stranded colorwork are coming together perfectly in this project. What fun.


Monday, May 10, 2021

Just felt it

Back in my early knitting days, I felted a lot of things - bags, boxes, slippers, and whimsical objects like pumpkins... and a very colorful fish!

Felting knits was definitely a trend in the early-to-mid aughts. But I never felted my weaving. UNTIL NOW.

The Spring 2021 Yarnworker WAL is a project called Full On Coasters. Because I had yarn in stash, I decided to felt along. I used leftover Nature Spun Prairie DK (from the ruana project). These colors seemed to have enough contrast to work:

It took no time to warp up the Cricket with alternating colors.
I did a little sampling at the beginning, and then worked four colorwork patterns:

  1. 3 picks lost lake (the darkest color), 1 pick misty mountain (the dusty teal)
  2. 3 picks misty mountain, 1 pick lost lake
  3. 1 pick misty mountain, 1 pick half and half (white)
  4. 1 pick lost lake, 1 pick half and half

I didn't realize until later that I wasn't supposed to hemstitch both ends of each coaster, but that's what I did (just like I make towels) ... so this is what my piece looked like when it came off the loom. The sampling is at the bottom left corner of this photo:

This warp is only 8 or so inches wide, so these are little things. I cut them apart and threw them in the washing machine.

Here is how they looked when they came out:


I let them sit that way for about a week. I just wasn't sure if I wanted to cut them. But in the end, I did. It's kind of cool to be able to safely see the cross-section of the woven fabric:
You can see that the side edges of these coasters (the selvedge edges) did not always felt at the same rate as the ends where I worked the hemstitch. MY BAD. But I just cut all four sides until I had something squarish. 

Here they are after they're trimmed:


I definitely have a favorite design - it's the one on the bottom right, which was pattern #4: one pick lost lake, one pick half and half. It looks so delightfully tweedy!

I wouldn't mind making an entire set of these... but I don't have enough of the darkest color, lost lake, to do that. So for now, these will just be a fun experiment. I'm reminded that just like in felted knits, felting one's weaving hides a lot of weaving mistakes.

Thursday, May 6, 2021

Tweed and Columbia

In addition to the super fun and useful class on blending boards that I took at (virtual) MDSW this year, I also took two classes from Judith MacKenzie: one on spinning tweed yarns, and one on spinning the Columbia breed.

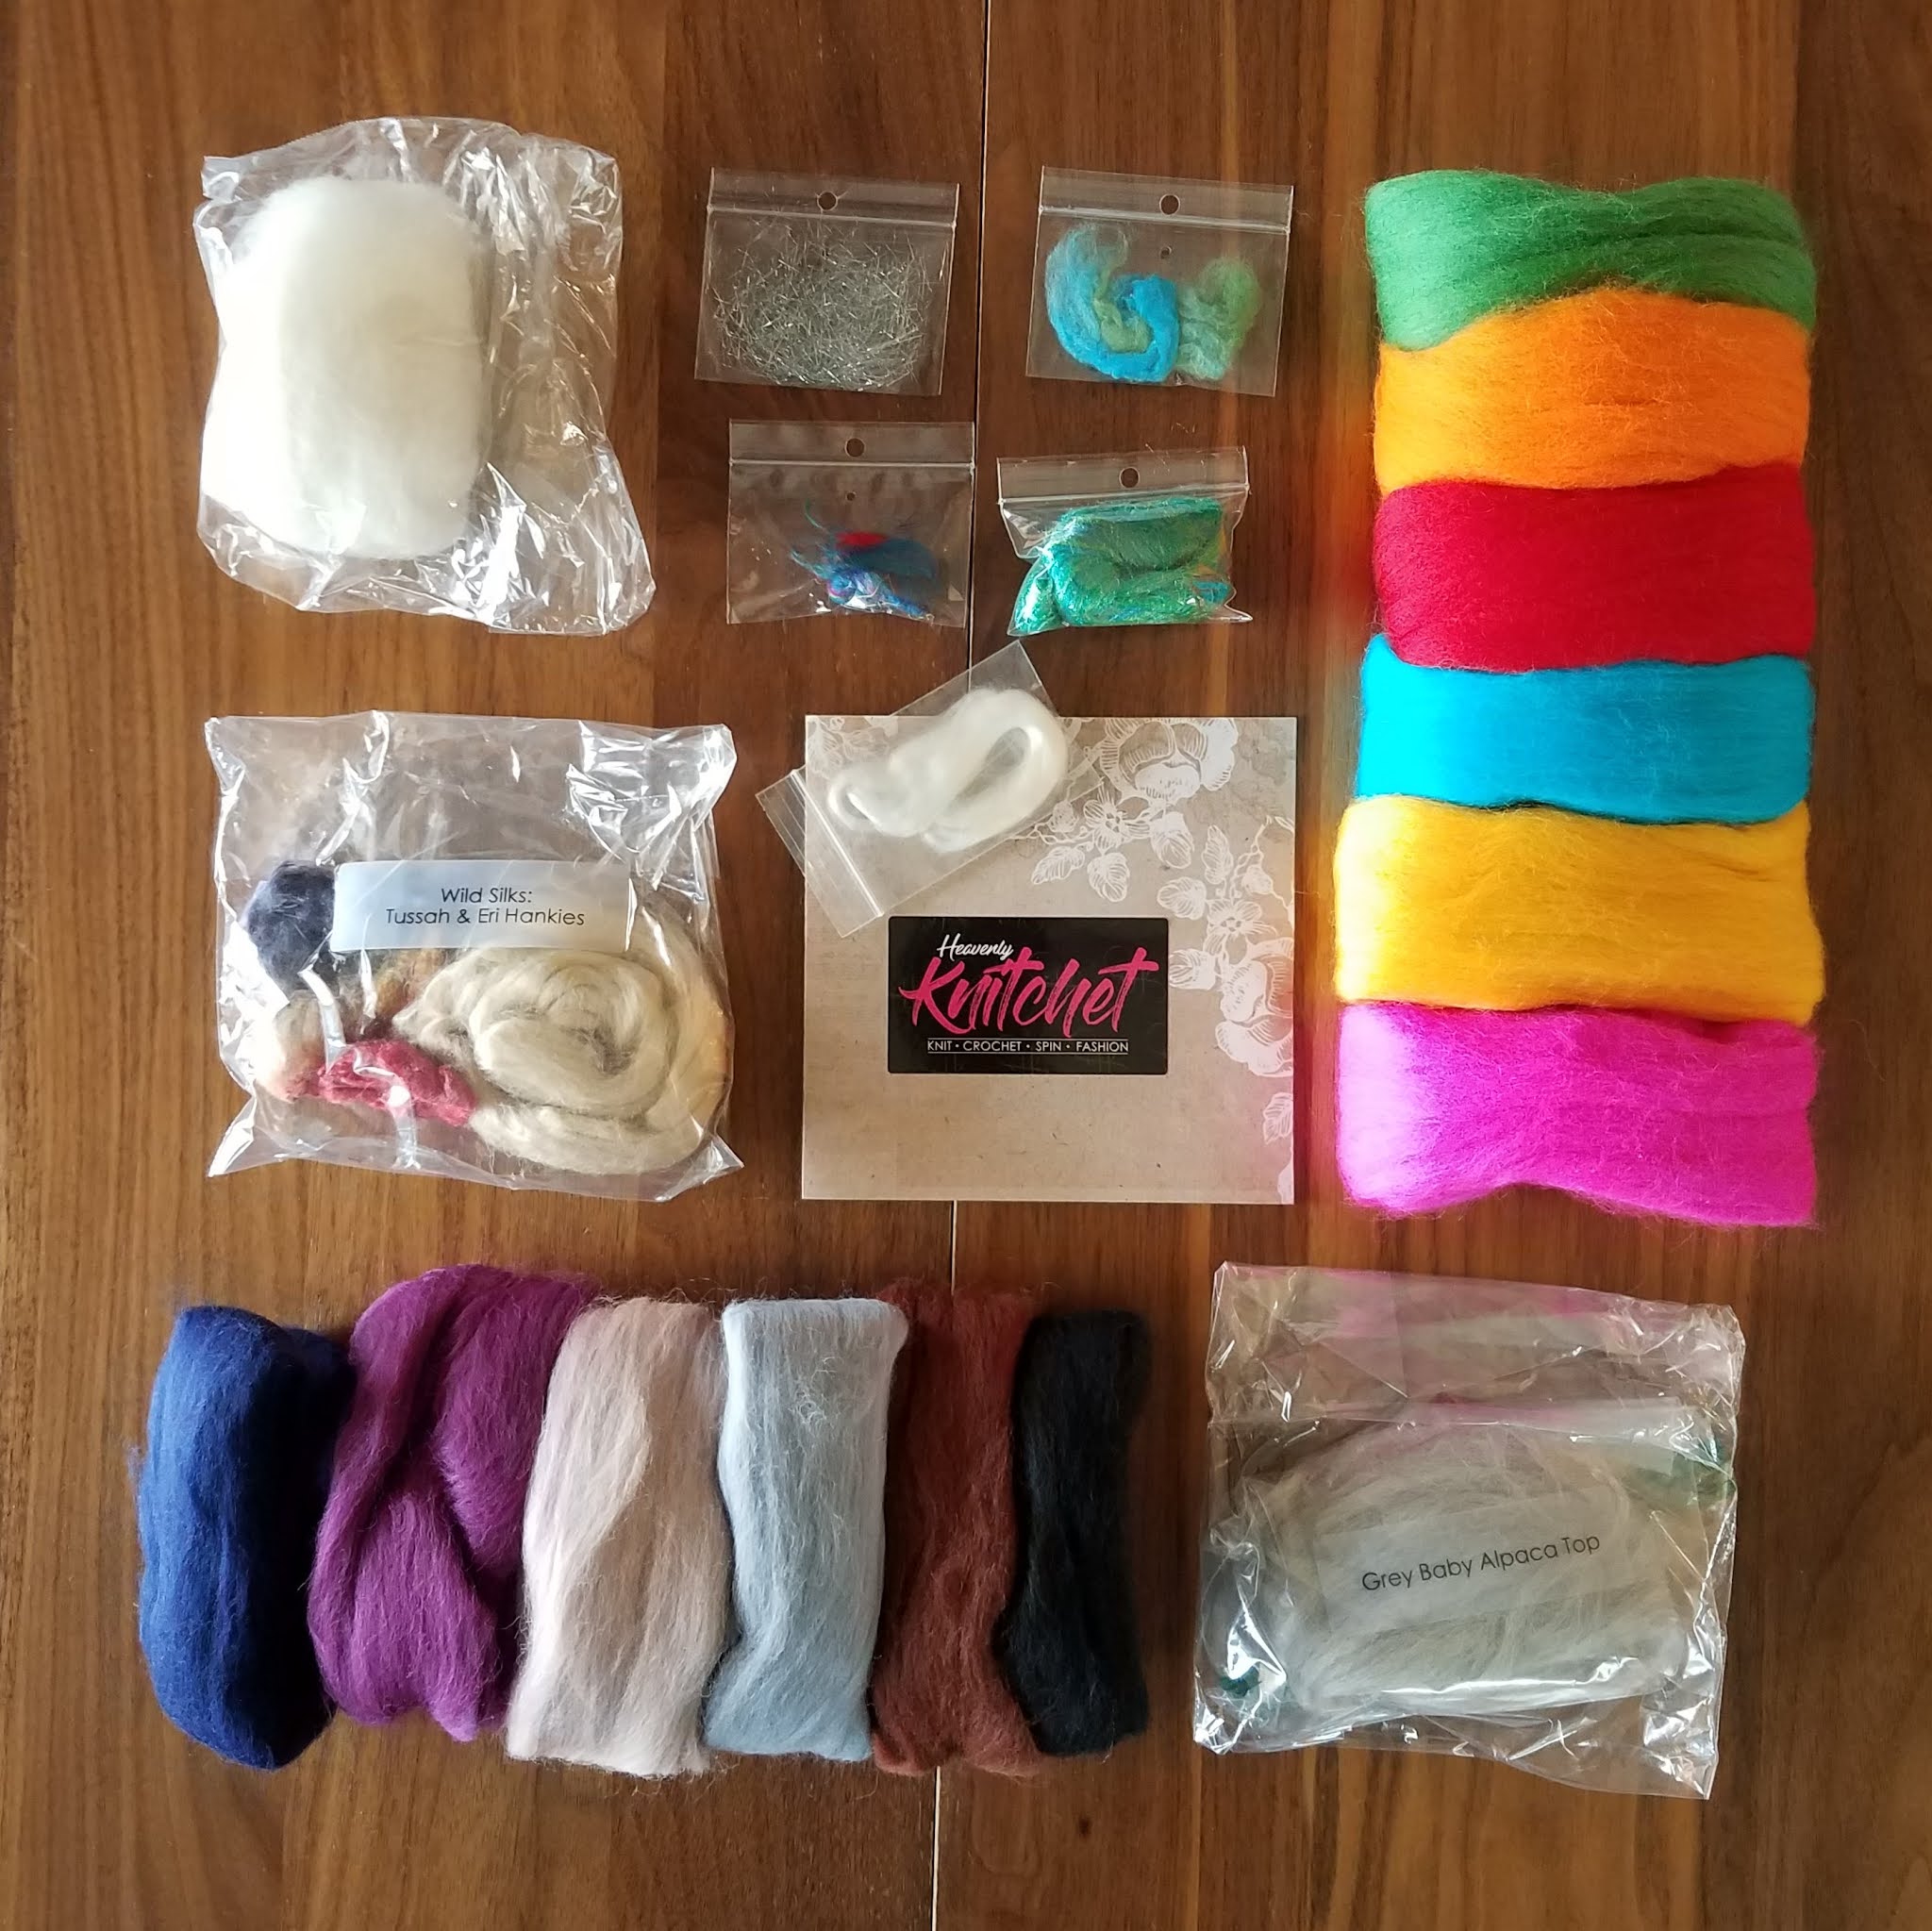
The timing ended up not being great for me. The classes were both 7-9 pm, and the Tweed class fell on the day after my second COVID vaccine shot. I was not feeling well and my brain was definitely not operating at 100%. Fortunately, the class was recorded and I can re-watch it! I can tell I wasn't feeling well because I took no photos during the class (very unusual for me). But here is the class kit that arrived in the mail beforehand. What a wonderful collection of fibers to play with!


Tweed is yarn made from leftover and recycled fibers, and that is what some of this material is. If you look closely, you'll see a bag of yarn snippets, a bag of woven fabric strips, and a bag with pieces of a cashmere sweater in it (one piece is unraveled so it looks like ramen). Tweed fabric is named after the River Tweed, on which the mill that wove this fabric was located. 

The bag of fiber on the left side of the photo is Judith's own tweed roving, made from alpaca, Shetland, and silk waste. She has this carded specifically for handspinning. I can't wait to dive into it.

During the class, we endeavored to card our own blends for spinning tweed. Judith (or "Mother MacKenzie," as I think of her often) recommended using an old, battered, pair of handcards that can really take a beating. But I don't have an old pair of handcards - I only have the one pair, which I don't want to mess up. My carded preps didn't spin terribly well. Here are the samples I spun during class:


I really love the idea of tweedy yarn made with leftover bits. In fact, that is essentially what I bought to make my Greynbow yarn with many years ago ... the mill that carded it couldn't even tell me what was in it, because it was recycled leftovers. But I think if I am going to make more tweed yarns, I might do best with a drum carder (which I don't own). Perhaps I can experiment with the blending board. 

The next evening, I had the class on spinning Columbia, which is the first American sheep breed. It's a cross between Rambouillet (a fine wool) and Lincoln (a long wool with great luster), and it really is lovely. Here is the kit that arrived for this class:

This fiber is all from the same fleece... and so was the fiber that all my classmates received. Columbia fleeces can be large (Judith said this one was about 15 pounds) and she still had more to spare! The fluffy roll on the left is a small batt (carded prep). In the middle is a collection of cleaned locks - these were folded and rolled in a bit of fabric in order to preserve the lock structure. The bag at the top right is raw fiber which I need to wash (note how dark it is compared to the clean fiber). And the small bag on the bottom right is silk, for blending. 

During the class, I worked with the clean locks in the middle. I flicked them with my flick carder to prepare them for spinning. This is a classic worsted prep, and I planned to spin the locks with a worsted style (short forward draft)... so I took care to keep the tips facing the same direction so I could spin from the tips. Here you can see a lock before and after flicking:

I acquired another new tool last week: a hairbrush cleaner. This was recommended as the best way to clean stray fibers out of the blending board, and as it was easily obtainable online, I ordered it. I LOVE THIS THING. It is so easy to get the waste fiber out of anything with carding cloth on it, including my flick carder!
I also cleaned my hairbrush.

I spun all those beautiful locks, and made this small skein of 2-ply yarn. It's so white and shiny - the Lincoln part of the breed really comes through:


Judith says there are "lots of dye sites" on Columbia, and the bright, blue-white color indicates this. I haven't heard anyone talk about dye sites before, but if Mother MacKenzie says it, then it's true. 

I really enjoyed flicking and spinning this skein. Alternating between flicking and spinning strikes me as an excellent way to avoid repetitive stress injuries. And it's fun. I could see doing a big spin this way, with the right fleece! 

The students in this class crowd-sourced a list of our favorite places to buy fleeces. Of course, the BEST place to buy fleeces is the MDSW Fleece Barn (Judith said it took her breath away the first time she saw it), but that's not always possible. I'll share the list here in case it's helpful to anyone else:

  • Maryland Sheep Breeders Association - check their directory
  • Individual Breed registry/associations - they will list fleece sellers
  • Shepherd's Hey Farm, MD- Lee Langstaff - this is where I got my first fleeces - you cannot go wrong with a Shepherd's Hey fleece - Jillian Moreno agrees!
  • Ruppert's Corriedales
  • Peggy Howell, MD
  • Kate Bostek, Roclans Farm, PA
  • Solitude Farm, Roundhill VA – Gretchen Frederick
  • Steitzhof Merino, Genopalette in MO.
  • Fiber First Farm, Washington State – Romeldale, Corriedale and some other crosses
  • Nistock farm in NY.
  • Sheep show winners lists!
  • Black Sheep Gathering, Oregon.  Small but excellent quality!
  • At MDSW the Fleece Show winners for the current year are always posted at the front of the Fleece Show and Sale Barn near the silent auction prize winning fleeces
  • Alice Field, Foxhill Farm in Lee Mass has outstanding Cormo

I really miss attending this festival in person, but I'm glad I got to take these classes. Next year is going to be a blowout festival. I can't wait.

Monday, May 3, 2021

Blending Boards: The Good, the Bad, and the Ugly

I was so happy to be able to take a class about using my blending board at this year's (virtual) Maryland Sheep & Wool Festival. I signed up for this class last year, but everything was cancelled due to COVID. The cancellation happened after I ordered a new blending board. I tried to use it a couple times over the summer, but my results were very poor. 

The class, titled Blending Boards: The Good, the Bad, and the Ugly, was taught by Heavenly Bresser. She created class kits, and I was super excited to open mine. Doesn't this look like so much fun?!??


The big pieces of fiber are merino top. There are also a bunch of add-ins, including tussah silk, eri silk, sari silk waste, tencel, comber's silk, alpaca, angelina, and firestar (the latter two are sparkly). 

Heavenly taught us two different methods of applying the fiber to the board. Here is my very first attempt. I forgot to take pictures as I loaded the fiber on the board, so you see here the first rolag I pulled off, as well as the remaining fiber which will become the second rolag:

It is so fun to "paint" these fibers onto the board. Heavenly pointed out that we're not technically blending fiber on the board - rather, we're layering it. Here are my first two rolags:
I spun one of them up really quickly to sample it - you can get a little sense of how the colors look in a finished yarn. The finer the yarn, the more blended it will look (because the spots of color are smaller):

For our next rolag, we all tried to work from the same "recipe." We began with these colors but applied them in different amounts. I have more navy blue than purple, and more purple than pink, and only a tiny amount of green (a complementary color):
Here I've started to layer the colors on the board. I'm only using the bottom section because this is just a sample rolag:
Here is the final (wee!) rolag, and also the yarn I spun from it (just a little sample):

The yarn is really fascinating to spin, because you never know what chunk of color is going to predominate. 

At the end of the 4-hour class, I decided to explore a more wild colorway. Here are the raw materials I started with (sometimes I add other stuff once I'm into the process):

These four colors are fairly equidistant from each other on the color wheel, sometimes described as a "square" arrangement. If I were to blend them in equal amounts, I would get a muddy mess. The trick is to let one color dominate and another recede. I filled the entire board this time, and ended up with these beauties:

I started and ended with the oranges and yellows. The blues and greens are sandwiched in the middle. Stay tuned to see how they spin up!

I'm still a beginning blender, but the process is so instantly gratifying and fun. Who wouldn't want to spin these colorful rolls of air?