Showing posts with label raglan. Show all posts

Monday, November 8, 2010

(Plan) C is for Victory!

Look, it fits over his head!IMG_7625 Plan C – cutting out the knitting from the cast-on edge – worked.  Here is what I cut off:IMG_7629The original neckline used short rows at the back so that it was higher at the center of the back than at the center of the front.  I didn’t try to replicate this on the new neckline because the raglan seam wouldn’t have been pretty.  Since I would have knitted in the opposite direction, the seam wouldn’t have lined up.  So instead, I picked up a round of stitches just below the cast-on edge at the front, which made it about 6 rounds down at the back, and just called that the new neckline.  You can see that it is now symmetrical – no more short rows:IMG_7638I did an applied i-cord and I think it looks very tidy.

It turns out that having a larger neck opening is probably better.  Boy 2 does not love clothes up around his neck.  This way, he can wear a t-shirt under the sweater and not complain about ANY itchies.  To me, this sweater is soft soft soft, but the angora fluff can be a teensy bit irritating, I guess…IMG_7626The sleeves look a bit short, but again, Boy 2 doesn’t like cuffs in his way.  I can always lengthen those next winter as needed, since they were bound off at the cuff.IMG_7639

I’m happy to call this project DONE!

Friday, November 5, 2010

Double Trouble

I’ve had some knitting setbacks as of late – involving Boy 2’s easy raglan sweater and Pam’s piquant socks.

First, remember the sweater that wouldn’t fit over Boy 2’s head?IMG_7523I executed Plan B: adding a neckline again, this time an applied i-cord edging on size 10 needles (the sweater itself was on 9s).  The result looked acceptable…IMG_7524 …but it still doesn’t go over his head.  So I’m going to rip that out.

My next plan (Plan C) is to do what everyone says can’t be done.  I’m going to run a cable or a lifeline or something through a round of stitches 3 or 4 rows below the edge, and then CUT the preceding rounds out.  I think I’ll still have live stitches, and I’ll try again with the i-cord edging.

If that doesn’t work, I’ll just unravel the entire thing and start again (that would be Plan D).  The way I see it, it can’t hurt to try the crazy Plan C if Plan D is your only remaining option.

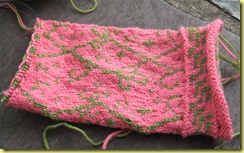
As for Pam’s socks… I have knit the leg and am poised to begin the heel flap, and they are simply too tight.  S1 couldn’t get them on at all.  I can get them on my ankle, but I know from experience that once I put a heel on these babies, they won’t fit anymore.  So they are going to be completely frogged.  Here is what I have so far:IMG_7526 I have not knit on these for about a week as I consider my next step.  First, I need to do more reading about how to knit colorwork.  I think I’ve been catching the long floats all wrong, but I’m not yet 100% certain of that.  I read this long blog post on dealing with floats, and I’ve determined that I’m definitely catching them too frequently.  I was worried about the really long floats – like 9-11 stitches long – and I would catch the float every 3-4 stitches.  But some Ravelry forum browsing indicated that with fingering weight yarn, I really needn’t catch floats unless they are more than 7 stitches (which some of mine would be).  Catching the floats, especially the way I’m doing it, tightens up the fabric.  It makes it really durable, but not very flexible.
As much as I hate to step back from Pam’s socks, I think I need to get out of the deep end of the pool and go back to the shallow end.  I’m not in the baby pool anymore, but I’m feeling decidedly out of my element.  So I’m going to READ more before casting on again, and I’m also consider knitting the Mad for Plaid socks before Pam’s socks:PlaidBIGpurple

Mad for Plaid will give me a chance to practice stranded knitting but it’s an intermediate step, in terms of difficulty.

If anyone has recommendations for a good book or website about stranded knitting, I’m very open to suggestions!

Wednesday, October 20, 2010

Pain in the neck

I finished Boy 2’s sweater this weekend.  It was quick and easy.  That is, it was quick and easy until I picked up stitches around the neckline and put in a very simply 2x1 ribbed band.  After that, it didn’t fit over the boy’s head anymore!

Sorry for this truly terrible photo (I don’t want to lay this down outside right now – everything is covered with dew).  This is how it looks without the neckline (which I already tore out):IMG_7320It fits over his head fine like this.  The stitches around the neckline stretch and it goes over.  But after I pick up stitches, which is something you usually want to do in order to stabilize a notoriously stretchy and potentially saggy area, it doesn’t fit anymore.  It’s not about the 2x1 ribbed band (which was stretchy in its own right).  It was definitely the picked-up stitches that caused the problem.

I’m bummed.  The neck is the CAST-ON EDGE.  To redo it would require ripping out the entire sweater.  I used the formula in the this pattern and it resulted in a 36 stitch neckline.  I thought that sounded too small and upped it to 40.  I guess I should have trusted my instincts and increased it even more.

Here’s a close-up of the unfinished neckline, which really requires something to make it look more attractive, I think:IMG_7321 Again, sorry about the glare off the floor (that' was even taken with no flash!).  So, what should I do?

  1. I could try a different edging.  Maybe an applied i-cord  or a crochet edging (like crab stitch?) would be stretchier?  I’m not sure.  Couldn’t hurt to try.
  2. Could I steek this a little to make a johnny collar look?  I’ve never done a steek and I’m not sure if you can do one if you didn’t plan to do one and leave a steeking area to cut.
  3. I hate to put this down as an option, but should I rip the whole thing out and start over?
  4. Is there some other simple way of finishing the rough stitches at the neckline that will not result in tightening them up too much?

Help needed!!!!

Friday, October 15, 2010

A soft sweater for a sweet boy

My youngest caught a whiff of the yarn fumes at this spring’s Maryland Sheep & Wool Festival.  He picked out this very soft merino-angora 2-ply at Jamie Harmon’s booth:IMG_6063 There’s a chill in the air, and it seems like a good time to whip this sweater out.IMG_7195I’m using the same top-down raglan pattern that I used for the Bada Bing sweater last fall.  It’s going quickly.  Here is where I was last weekend:IMG_7242 This photo looks kind of strange since I plopped the ball of working yarn in the neckhole… but you get the idea.

I have the body done now:IMG_7297I’ve decided to rip that sleeve back and begin again, decreasing more quickly.  My little guy has skinny spaghetti arms, and this sleeve already seems too flappy for him.  Perhaps I shouldn’t have made the raglan seam quite as long, but (a) I was hoping this would fit him for two winters, and (b) I want him to be able to get this on and off on his own, or else he won’t wear it at all (like the last pair of socks I made him).  So I erred on the size of large.

The colors in the first photo are truer than the ones in the second photo.  I had to shoot the second one in the pre-work wan light of my front porch today.  Outdoor photo opps are harder to find this time of year!

Sunday, October 11, 2009

Update on Bada Bing

I’ll bet you forgot that I was knitting this cherry red sweater… I cast on way back in late June when local cherries were in season.  I turned my attention away from it for Sock Summit and it took a while to get it back.  Then I worked on it pretty consistently for a while until I cast off the waist stitches.  That was a few weeks ago.  Here is its current state:IMG_4510

This is supposed to be a v-neck; I followed the instructions on The Incredible, Custom-fit Raglan Sweater page.  I didn’t make it very deep, though, and as a result, it doesn’t really look like a v-neck at all.  I’ll just make the neckband stitches (which are picked up later) pretty narrow.

At this point, I’m ready to pick up the arm stitches (still live on cables) and knit the sleeves down.  I’ll have to keep careful track of my decreases so I can replicate them on the other sleeve.  I didn’t keep very careful track of my decreases/increases in the body because I wouldn’t have to replicate them.  (There is a little bit of waist shaping in the body.)

There is a tiny edging in contrast color (a nice medium gray which doesn’t display very well in this photo) at the waist which I’ll repeat at the wrists and neckband.  We decided to make the edges in seed stitch so they won’t roll but also won’t pull in drastically like ribbing can do.  Here’s a closeup of the waist band:IMG_4513What else can I say about this project?  Oh, I bought new needles to knit it.  When working on my swatches, I realized that I fought with this yarn (which is Berroco Peruvia, a heavy worsted single) when using my pointy Knit Picks needles – and I didn’t fight with it when using my blunter Addi Turbos.  (I was working a circular swatch using 2 circulars, and I only had one set of size 9 tips for my Knit Picks cables so I supplemented with an old Addi that hadn’t seen much use in a long time.)  It made a huge difference in the snagging department.  My longest size 9 Addi was only 24”, so I ordered needles in two longer sizes (32” and 40”).  I’m happy to report that Addi has vastly improved their cable flexibility since the old days (when I was easily wooed to the Knit Picks needles partly for that reason).IMG_4512I think this is going to be a Christmas gift, so there’s not a huge rush, but just typing up this post makes me want to get back to it!  Thicker yarn really does knit up more quickly than sock yarn!  (I hear your “duh” from NE, K!)

Next update will be about spinning.